Wi-Fi Controlled robot using Node MCU ESP8266 Board. There are many types of Robots or Robotic Car
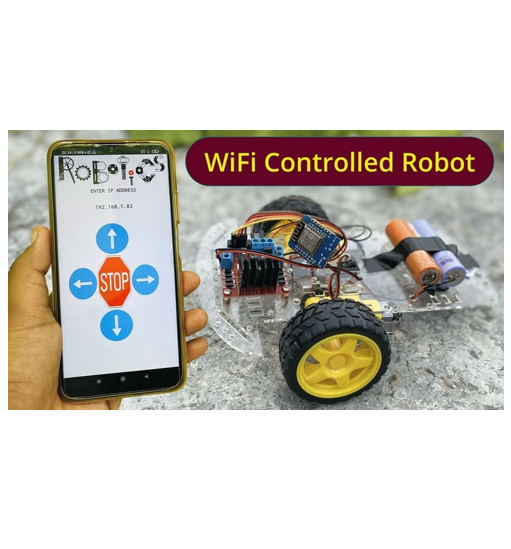
This Wi-Fi Controlled Robot is made using Chip as a control unit. To control the pair of Motors, we used L298n Motor Driver IC Module. We can power on the circuit using any battery as the power requirement is more than 5V. The Robot can be controlled using an Android App.
COMPONENTS REQUIREMENT:
Node MCU ESP8266, Jumper Wires, L298 Driver, 18650 Li-on Battery, BO Motors,
BO wheels, Battery Case.
Creating a Wi-Fi Controlled Robot project involves designing and building a robot that can be controlled remotely over a Wi-Fi connection using a smartphone, computer, or other Wi-Fi-enabled devices. Here’s a comprehensive outline to help you get started:
**1. Project Overview:**
Introduce the Wi-Fi Controlled Robot Project, explaining its purpose of creating a robot that can be controlled remotely using Wi-Fi technology for various applications.
**2. Robot Design and Components:**
Detail the design of your robot and the components needed:
– **Chassis and Wheels**: Choose a suitable chassis and wheels for your robot’s mobility.
– **Microcontroller**: Select a microcontroller (Arduino, Raspberry Pi, etc.) with Wi-Fi capabilities.
– **Motor Drivers**: Include motor drivers to control the robot’s movement.
– **Power Supply**: Provide power sources for the microcontroller, motors, and other components.
– **Sensors (optional)**: Integrate sensors (ultrasonic, camera, etc.) for obstacle avoidance or enhanced functionality.
**3. Hardware Assembly:**
Explain how to assemble the hardware components:
– **Chassis Assembly**: Assemble the robot’s chassis and attach wheels.
– **Microcontroller Setup**: Set up the microcontroller and connect it to motor drivers, sensors, and power supply.
– **Motor Control Wiring**: Connect motors to motor drivers and wire them to the microcontroller.
**4. Wi-Fi Connectivity:**
Discuss how to establish Wi-Fi connectivity for remote control:
– **Wi-Fi Module**: Include a Wi-Fi module (such as ESP8266 or ESP32) to enable communication with the microcontroller.
– **Wi-Fi Configuration**: Develop code to configure and connect the microcontroller to a Wi-Fi network.
**5. Software Development:**
Explain the software aspect of your project:
– **Control Logic**: Develop code to interpret control commands from a remote device and control the robot’s movement accordingly.
– **User Interface**: Create a user interface on a smartphone app or web page to send commands to the robot.
– **Sensor Integration**: If using sensors, write code to read sensor data and trigger appropriate actions.
**6. Testing and Debugging:**
Describe how to test and debug your Wi-Fi Controlled Robot:
– **Wi-Fi Connectivity**: Verify that the robot can connect to a Wi-Fi network reliably.
– **Control Verification**: Test remote control functionality using the user interface.
**7. Remote Control Interface:**
Discuss the different ways users can remotely control the robot, such as smartphone apps, web pages, or custom software.
**8. Video Streaming (optional):**
If you’re using a camera sensor, explain how to implement video streaming from the robot to the remote device.
**9. Challenges and Solutions:**
Address potential challenges like latency in Wi-Fi communication, connectivity issues, and software bugs, and provide solutions.
**10. Future Enhancements:**
Suggest future enhancements, such as autonomous navigation, advanced sensors, or integration with voice commands.
**11. Conclusion:**
Summarize the project and highlight its benefits in terms of remote control and exploration capabilities that a Wi-Fi Controlled Robot offers.
By following this outline, you can create a Wi-Fi Controlled Robot that can be controlled remotely and explore the exciting world of robotics and wireless communication.
* Product Images are shown for illustrative purposes only and may differ from actual product.
Package Includes :
- Completely ready projects
- 1 x Wi-Fi ROBOT Project.



Reviews
There are no reviews yet.